


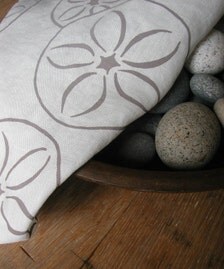
I may not live near the ocean, but my lakeside cottage in western New York conjures the pulse of waves and the silvery rush of wind through the saltgrass. While many of my nautical treasures come back with me from trips to my grandparent’s South Carolina beach house, plenty of others come from the shops featured on Nautical by Nature. This charming pillow from At Home with Aubrey is still one of my favorite buys.
There is no shortage of beautiful seaside-inspired décor. There is, however, a limit to how much I’ll allow myself to spend on that beautiful seaside-inspired décor. So what to do when I just have to update my sunroom or den? I search the web and the latest issues of Southern Living and Style at Home for the latest designs and then I make them myself.
Here are some easy-as-pie nautical DIY projects:
Message in a Bottle

A handmade message in a bottle is a great statement piece for your mantle or dining table centerpiece. Any glass vessel will work, but I prefer a bottle from the antique shop. If the bottle you choose doesn’t have a cork, you have an excuse to pick up some wine—just make sure it’s sealed with a real cork, not a plastic substitute.
The message inside can be anything you want—the words to your favorite sea shanty, a poem, prayer, or love letter.

You’ll need:
• A bottle with a cork
• Your message (make the paper more ‘authentic’ with these ideas)
• Any of the following: sand, small shells, sea glass, driftwood, fish hooks, knotted twine
• Optional: rope or fishing net
1. If your bottle still has a label on it, soak it in hot water for 15 minutes and then scrub the surface with a dish towel. If there is still leftover adhesive residue, repeat this process. Make sure the bottle is clean and dry inside.
2. Age the bottle, if desired. Rub the bottle against cement or stone to add scratches, pitting, and clouding.
3. Fill the bottom of your bottle with sand, shells, or any other beach-themed ephemera. The amount is up to you.
4. Roll your message and secure it with a bit of twine, if desired. Slip the message inside the bottle.
5. Cork your bottle. If you wish, add character by tying a length of rope around the neck of the bottle, or wrap the whole thing in a piece of scrap fishing net.
Coasters

These rope coasters are functional without compromising character. I prefer to use rope constructed with natural fibers such as coir, hemp, and cotton. Nylon is fine, too. You can use colored rope if you want to match a specific color scheme.
You’ll need:
• Several feet of thin rope
• Mason jar lids (just the flat part, not the ring)
• Hot glue gun
• Scissors
1. Put a small dot of hot glue in the center of a jar lid. Firmly press the end of the rope into the glue.
2. Adding dots of glue on the surface of the lid as you go, begin to tightly coil the rope, working outward from the center of the lid. Work slowly and be sure to apply enough pressure to prevent the rope from uncoiling until the glue is fully dry.
3. When you reach the outer edge of the lid, cut off the excess rope. Glue the end to the outermost coil. Cutting the rope at a 45-degree angle will give your coaster a more finished look.
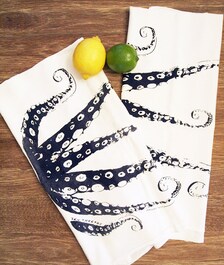
Sea Creature Tea Towels
You’ll need:
• Craft or florist foam
• Pen or pencil
• Paring knife
• Acrylic paint mixed with fabric medium
• Small paintbrush
• Plain fabric tea towels
1. Once you know what design you’d like on your tea towels, use a ballpoint pen or pencil to sketch the image onto the foam. Press firmly enough to leave an imprint. Remember that the design will be reversed once it is stamped onto the tea towels.
2. Use a paring knife to carefully carve the foam. Decide whether you want the image to show up as positive or negative space. For a positive design, you will want the lines that make up your image to be the only part of the foam that isn’t cut away. For a negative design, you will want to cut away only the lines that make up your image.
3. When you are satisfied with your design, use a paintbrush to apply a thin, even layer of acrylic paint mixed with fabric medium to the foam stamp. Test it out on a piece of scrap paper before stamping the design onto the tea towels. If your test print doesn’t come out the way you wanted, this is a great time to refine your design with the paring knife.
4. Once again, apply a thin, even coat of paint to your stamp. Carefully press the stamp onto a tea towel, and then allow the paint to dry.
Madeline Everett is a freelance writer, design consultant, and New England native.


I love all of these DIY, especially the last one!
ReplyDeleteLauren,
http://atouchofsoutherngrace.blogspot.com/
These are so cute, the messages in a bottle would be perfect for parties!
ReplyDelete-Alex
http://www.monstermisa.blogspot.com/